
Unlock the full potential of your iPhone’s camera with these top iPhone camera tips. Whether you’re a seasoned photographer or just starting out, mastering these techniques will elevate your photography to the next level. Learn how to capture stunning photos and videos, explore iPhone camera settings, and discover hidden features that will transform your mobile photography experience. From composition and lighting to utilizing advanced iPhone camera features, this guide offers valuable insights to help you take better photos.
This comprehensive guide covers a range of iPhone camera tips, including utilizing Portrait Mode for professional-looking portraits with blurred backgrounds, mastering Night Mode for capturing breathtaking low-light shots, and exploring the versatility of iPhone camera settings like exposure, focus, and white balance. We’ll also delve into the power of third-party apps and accessories to further enhance your iPhone photography. Get ready to take your iPhone photos from ordinary to extraordinary with these practical tips and techniques.
Understanding Your iPhone Camera
Before diving into specific tips, it’s crucial to understand the basic components of your iPhone’s camera system. This foundational knowledge will empower you to make informed decisions while shooting.
Key Hardware Elements
Your iPhone camera is more than just a lens. It’s a sophisticated system comprising several key elements:
- Lens: This gathers light and focuses it onto the sensor.
- Sensor: This component converts light into digital information, forming the image. A larger sensor generally captures more light and detail.
- Image Processor: This powerful chip processes the data from the sensor, applying various algorithms to optimize image quality.
Software and Modes
Beyond the hardware, your iPhone’s software plays a vital role in capturing stunning photos. Familiarize yourself with different shooting modes:
- Photo: The standard mode for capturing still images.
- Portrait: Creates a depth-of-field effect, blurring the background and emphasizing the subject.
- Video: For recording moving images.
Understanding these core elements and modes is the first step towards mastering your iPhone photography.
Using Grid and Focus Lock
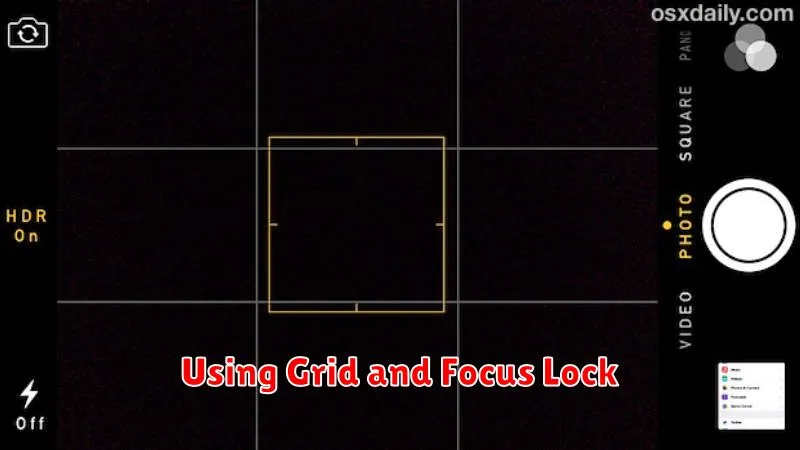
The iPhone camera app offers tools to enhance composition and focus. Enabling the grid overlays a rule-of-thirds grid onto your screen. This helps you position key elements effectively, leading to more balanced and visually appealing photographs.
Focus Lock, also known as AE/AF Lock, allows you to maintain a specific focus point and exposure setting. To activate it, tap and hold on the area of the screen you wish to focus on. A yellow box labeled “AE/AF LOCK” will appear, indicating that the focus and exposure are now fixed. This is particularly helpful in situations with challenging lighting or when photographing moving subjects. This prevents the camera from constantly readjusting focus and exposure.
Portrait and Night Modes Explained
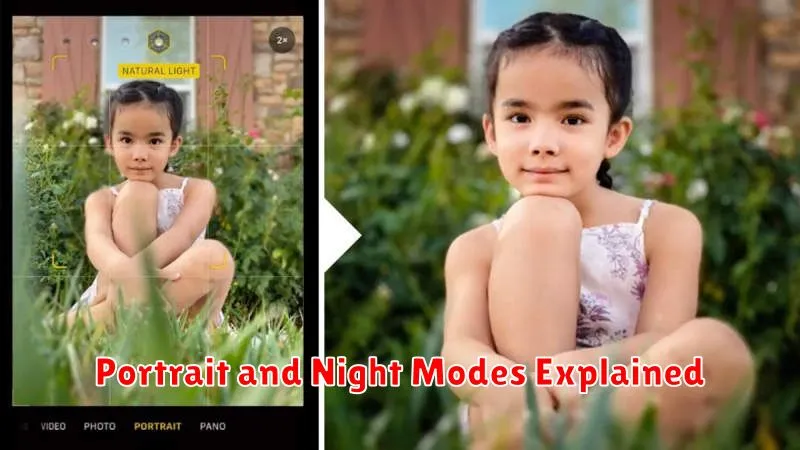
Portrait mode creates a professional-looking photo with a blurred background, also known as bokeh. It works by using the iPhone’s multiple cameras to sense depth and separate the subject from the background. This mode is particularly effective for portraits of people, pets, or objects.
To use Portrait mode, open the Camera app and select Portrait. Position your subject and tap the shutter button. You can adjust the blur intensity after taking the photo by tapping “Edit” and adjusting the Depth Control slider.
Night mode brightens photos taken in low-light conditions. It automatically activates when the iPhone detects a dark environment. Night mode works by taking multiple exposures at different shutter speeds and then blending them together to create a brighter, more detailed image.
You can adjust the exposure time in Night mode by tapping the Night mode icon (moon icon) and adjusting the slider. A longer exposure time will result in a brighter image, but may also introduce blur if the camera or subject moves.
Adjusting Exposure Manually
While the iPhone’s automatic exposure usually does a good job, sometimes you’ll want more creative control. Manually adjusting the exposure allows you to fine-tune the brightness of your images.
To adjust exposure, first tap to set the focus point. A small sun icon will appear next to the focus box. Swipe up on the screen to increase the exposure (making the image brighter) and swipe down to decrease it (making the image darker).
Keep an eye on the image preview as you make adjustments. Be mindful of highlight clipping (loss of detail in bright areas) and shadow clipping (loss of detail in dark areas).
Using Editing Tools in Photos App
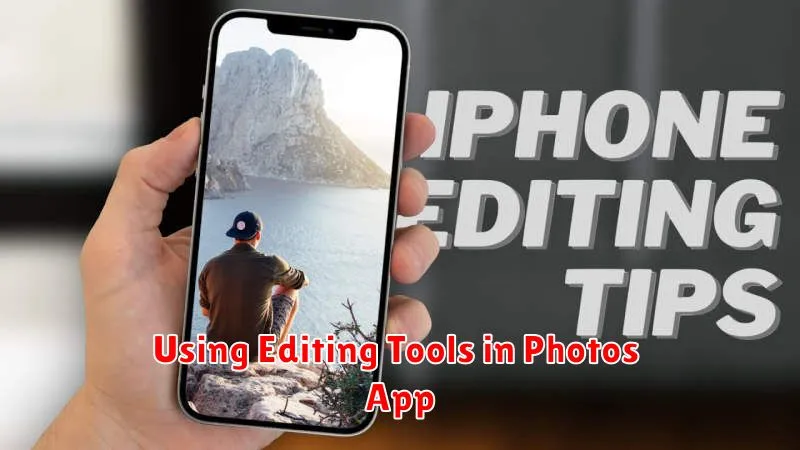
The iPhone Photos app offers a powerful suite of editing tools to enhance your images directly on your device. These tools allow for quick adjustments and corrections, eliminating the need for third-party apps for minor edits.
Key Editing Features:
- Light: Adjust exposure, brilliance, highlights, shadows, contrast, brightness, and black point to fine-tune the overall tonal balance of your photo.
- Color: Modify saturation, vibrance, and white balance for more accurate or stylized color representation.
- Cropping and Rotation: Straighten, rotate, and crop your images to improve composition and remove unwanted elements. Preset aspect ratios are available for various platforms and print sizes.
- Filters: Apply a variety of built-in filters for quick stylistic changes. Adjust the intensity of each filter to suit your preference.
To access these tools, open a photo in the Photos app and tap “Edit” in the upper-right corner. Experiment with the different adjustments to see their impact on your image. The changes are non-destructive, meaning you can always revert to the original photo.
Shooting in RAW Format
For those seeking maximum control over their iPhone photography, shooting in RAW format is a game-changer. A RAW file contains uncompressed image data, offering significantly more flexibility during post-processing compared to standard JPEGs. This means you have greater latitude to adjust aspects like exposure, highlights, shadows, and white balance without significant quality loss.
While iPhones don’t natively save images in the traditional .RAW format, they use the Apple ProRAW format, which provides a balance between the benefits of RAW and the computational photography built into iOS. ProRAW files are considerably larger than JPEGs, so be mindful of your storage space. Enabling ProRAW is typically done through the Camera settings within the Settings app or by using the RAW toggle in some third-party camera apps.
Cleaning Lenses for Clear Shots
Maintaining clean lenses is crucial for capturing sharp, clear images. Smudges, dust, and fingerprints can significantly impact image quality, leading to blurry photos and reduced clarity.
Use a soft, lint-free cloth, such as a microfiber cloth, to gently wipe away any debris. Avoid using abrasive materials like paper towels or clothing, as these can scratch the lens.
For stubborn smudges, lightly dampen the cloth with lens cleaning solution. Never apply liquids directly to the lens. A small amount of moisture on the cloth is sufficient.